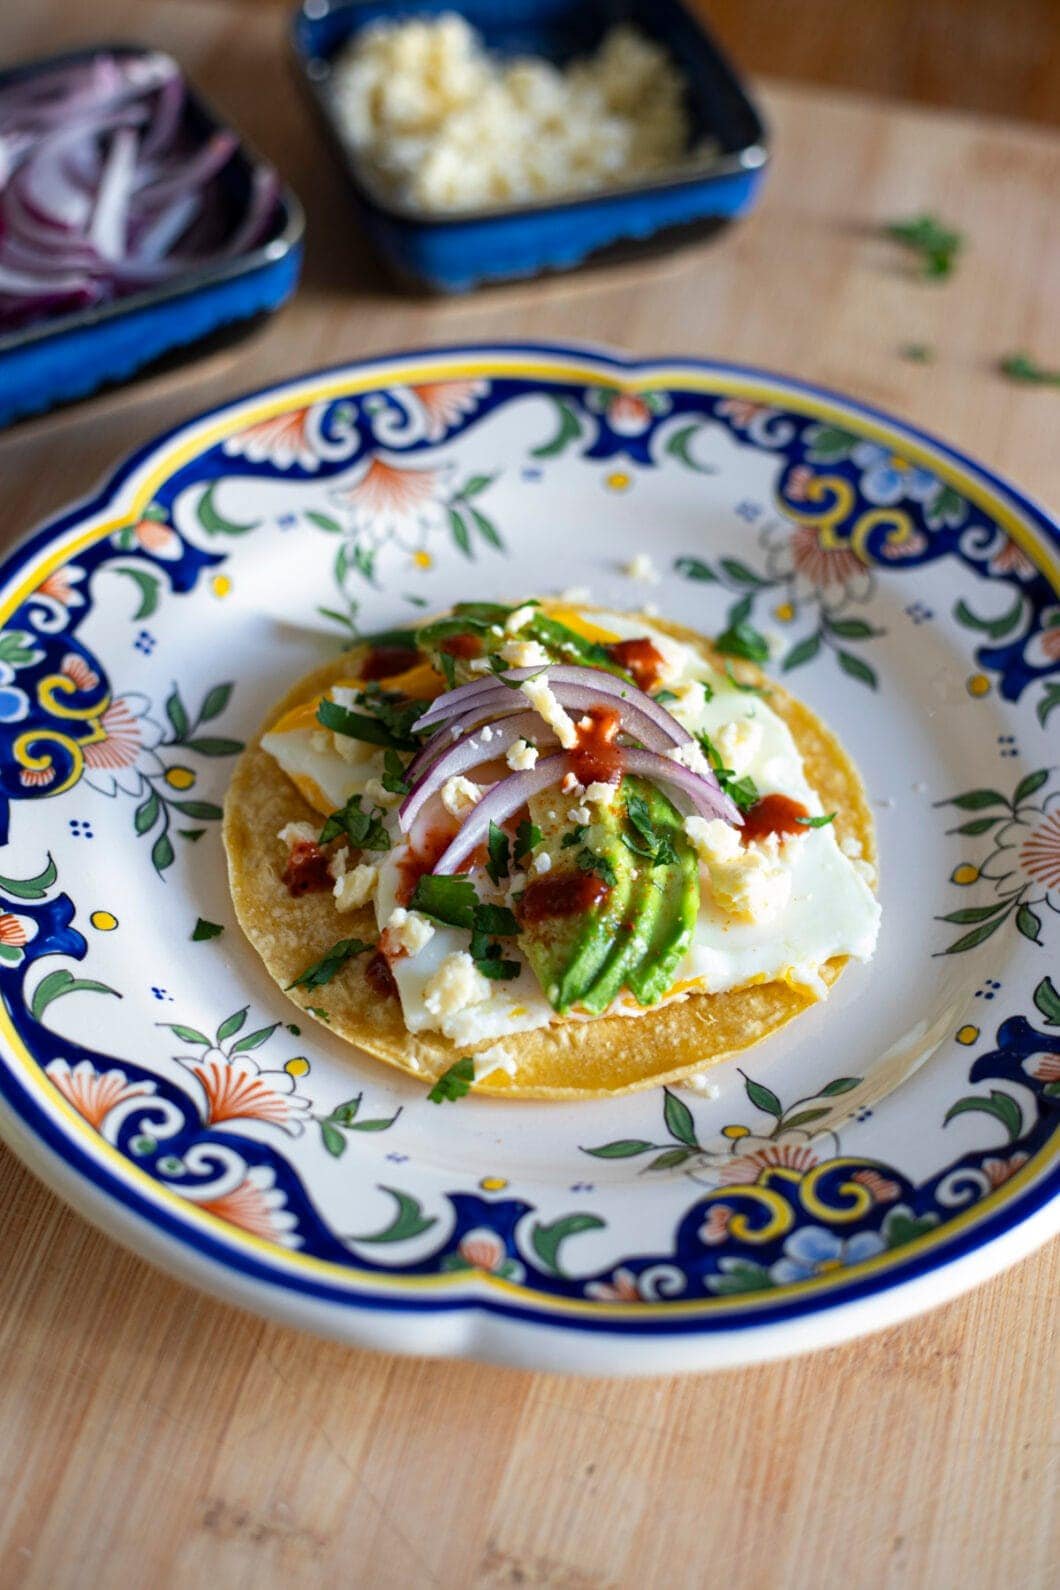
Post Type ArchivesRecipes

Classic Tteokbokki

Tteokbokki is the street food dish you will find at every stall in Korea.

Easy to make, easy to eat, bright red and full of that Korean fieriness, Tteokbokki will seduce you, as long as you can handle a bit of spice and appreciate some chewiness. The key to that true Korean taste is in the classic Korean broth, with kelp and anchovies ; it is the same as for Kimchi Jigae. If you don’t eat fish though, you can replace it with a vegetarian dashi, or a vegetable bouillon, but a quality one.

The whole dish is a breeze ! It’s not the quickest one (45mn if you have some broth already on hand, else closer to 1h), but it is a very simple recipe to follow. There are other quicker recipes for Tteokbokki out there, but you won’t regret putting in a little more effort. The umami from the broth and sauce is so rewarding, and the many flavours and textures (a bit of cabbage for the crunch, the chewy rice cakes, the spongy fish cakes, the smooth, glistening red sauce) bring a lot of interest to this humble Korean street food dish.

Classic Tteokbokki – Recipe

Ingredients – Advice & key points

  • You will need to visit an Asian store, possibly a specialized Korean store, to find Tteok (rice cakes), Eomuk (fish cakes), Daikon and dried anchovies. Those items can be tricky to find. If all else fails, don’t forget to try online !
  • For the other Asian items, you should have less trouble finding them.
  • Tteokbokki reheats well ; don’t hesitate to double the amount and enjoy delicious leftovers (I know I did !) Just add a little water when you do.
  • If you make anchovy stock, I highly recommend you to make a large amount, then freeze it.

Let’s dig into it !

If you’re into spicy Korean food, check out my GOAT Kimchi Jigae, too !

Asparagus & wild garlic Risotto

Springtime, finally ! This is a fresh, light risotto that you will enjoy eating when the sun starts to shine back, thanks to the wild garlic, chives and lemon. Don’t be fooled ; there’s a generous amount of parmigiano and butter, too, but sshh, you can’t really tell !

Plus, asparagus is a beauty that can only be enjoyed around 2 months a year, so rush to your farmer’s market and make some damn asparagus !

Then I advise you to respect the italian basics for authentic risotto :

  • no cream, just butter and parmiagiano (at the very end of the cooking process) ;
  • use some onion for its sweetness, and a glass of white wine to bring some welcome acidity ;
  • toast your rice in the pan before adding your liquids ;
  • add your broth one ladle at a time, to let the rice release all its starch and make the creamiest risotto ;
  • try to use a holed spoon (risotto spoon), which will allow you to stir your risotto frequently (you don’t want it to stick to the bottom of your pan) without crushing it. ;
  • please taste regularly once you reach the 15mn mark.

Asparagus & wild garlic Risotto – Recipe

Ingredients – Advice & key points

All your produce for this recipe should be easy to find, provided you’re doing it at springtime !

  • Rice : It is very important to use risotto-appropriate rice. The three most common varieties are :
    • Carnaroli rice, the king of risotto rices ; use it if you can ;
    • Arborio rice, which is the second best choice, and more widespread than Carnaroli ;
    • Vialone Nano, which cooks up more quickly than carnaroli (eg easy to overcook), and yields very creamy risotto.
  • Asparagus : We’re using the green kind here ! I wouldn’t recommend using the white one in a risotto. Besides, I peeled them here, but you can do without, especially if your asparagus is not dehydrated (it can become fibrous if it was harvested a while ago). However, I recommend you to remove the bottom part of the asparagus anyway, as it is usually quite rough and fibrous.
  • Wild garlic : You should be able to find some at springtime, but if you don’t, just add more chives !
  • Vegetable broth : The broth here imparts a lot of flavour, so I highly recommend you either buy a quality one or do it yourself. I almost always do it myself, using veggies scraps that I gradually add to a plastic bag in my freezer. When you need some broth, just throw them in some water with a bit of salt, 2 bay leaves, a few sprigs of thyme, and an hour later, you get a delicious homemade broth !

Risottos don’t reheat very well, but I tend to do it anyway by adding leftovers +a splash of stock (2-3 tbsp) to a pot or nonstick pan on medium-low heat. The taste will not be as bright and fresh as the first time, but it is still a quick and nice meal to have.

Now come and cook !

GOAT Kimchi Jigae

Kimchi Jigae is what I almost always ask for at Korean restaurants. It’s also how I judge a Korean restaurant ; if they offer one, they’re authentic. If they don’t, I’m not interested.

Kimchi Jigae outclasses any other Korean dish in my eyes. It has such a complex taste. The balance in flavours is unusually perfect : the sourness and savoriness come from the old kimchi and the gochujang, which are both fermented and quite salty ; the onion, with added sugar, and fat from the pork round it all out. You don’t really know where to stand, because you get such comfort from this perfect broth, and one second later you get that spice kick right in your face. I love it.

Everyone talks about the umami, this « fifth taste ». From what I’ve tried, if there is one dish with crazy umami, it’s this one. Once you start, you can’t stop getting back at it, and your pleasure grows instead of disminishing as you eat it !

I’d go so far as saying you have not tried Korean cuisine if you have not tasted one of their stews. The average Korean eats Kimchi Jigae at least once a week ; when they go abroad, they cannot stay without it for long. The same goes for Doenjang Jigae ; if you can’t eat spicy food, try this one instead.

GOAT Kimchi Jigae – Recipe

Ingredients – Advice & key points

  • Kimchi : You need to use old kimchi for this recipe, or it just won’t be tasty. The sourer, the better !
    • If you only have fresh one, leave it out of the fridge for 2-3 of days, it will ferment much quicker. If you taste it and find it too sour to be pleasurable as is, you’re good to go.
    • You can use store-bought or homemade, so long as the kimchi is sour. Of course, I recommend homemade, which is what I do. I’ll post my Kimchi recipe someday !
  • Pork :
    • You can buy your pork pre-sliced at the frozen section of your Asian grocery store, if the store is large enough.
    • If you cannot find it, it’s ok ; you can easily slice the meat paper-thin at home ! You will only need to freeze your cut around 1 hour to make it easier to cut. It should be quite solid, but not rock-solid.
    • I used a mix of pork belly and pork shoulder. Either one if fine, but if you need to choose, I recommend pork belly, which is fattier. It will make for a tastier broth, and since we’re really using a small amount, it remains quite healthy.
  • I recommend you to go to a specialized Korean store, or large enough Asian store, to make sure you find all the ingredients you need (especially for the fresh Daikon, kelp, gochujang, gochugaru and dried anchovies).
  • If you can take a bit of heat, but not necessarily much, just remove the gochugaru and try to pick or make a kimchi that is not too spicy. It should be enough, as the recipe is definitely spicy, but not crazy spicy.

Cooking and eating GOAT Kimchi Jigae

  • You don’t need to use a Dolsot like I do. The cool part about Dolsots is that they retain the heat well, so your Kimchi Jigae will remain piping hot as you eat it. But simply use any pot you have ; I’m sure it won’t turn real cold, because you will devour this dish in no time !
  • It is nice to eat some side dishes to go with your Kimchi jigae. If you’re brave enough, you could cook 1 or 2 vegetables banchans along with it, such as simple spinach, bean sprouts or cucumber ones. I simply tend to buy them from the Korean mart -because they are delicious !
  • I often eat my Kimchi Jigae with rice only, and it’s still the best thing ever.

Trust me on this one !

Sea urchin pasta (Spaghetti ai ricci di mare)

I was meaning to film the magnificent spaghetti aglio, olio e peperoncino, when I came across a Uni pasta recipe that made me drool. I had seen it several times before on social networks : it is particularly popular in Japan. But then my eyes started to bulge as I saw “cream” in the ingredients list.

Cream ? In pasta ? With seafood ?? No can do ! I really think I was Italian in a former life because of my unlimited respect for proper pasta rules.

I then researched how to make authentic Spaghetti ai ricci di mare, the Italian version of this sea urchin dish. It is basically aglio, olio e peperoncino pasta, with a wonderful umami addition ! So simple to make, with an elegant twist.

Sea urchin pasta – Recipe

Ingredients – Advice & key points

  • Sea urchins :
    • Do know that sea urchins are on the pricey side ! This dish is a small luxury. 90g of sea urchin roe, or its shelled sea urchins equivalent, might cost you anywhere from 15 to 60 euros, depending on your country and the sea urchin type. Mine were in the lower range, so it was quite reasonable.
    • You will need to make a trip to the the fishmonger’s for this one : we need some damn fresh sea urchins !
    • You will usually be able to find shelled sea urchins ; if you do, make sure you use them within 24 hours, and ideally right away. This way, your pasta will be ready within 25 minutes, yay ! You’ll need 90g of sea urchin roes for 2 people (equivalent to around 3 sea urchins ; each sea urchin will contain around 4 to 5 roes, with a roe weight of around 30g. It depends on your urchin kind, so kindly ask your fishmonger’s for the approximate urchin weight).  
    • If you buy unshelled sea urchin, you will usually be able to keep them in your fridge up to 48 hours, in a large bowl covered with a moist kitchen towel. They must be kept at a temperature between 0ºC and 4ºC.
      • Don’t be impressed with the shelling proccess ! It really is a breeze when you know how to do it and you’re equipped appropriately.
      • You will need cut resistant gloves (less than 10€, to buy online or from the hardware store) and scissors (not too fragile, such as kitchen scissors). That’s it ! It will then only take 10 minutes of your time for 3 sea urchins.
      • For all the info you need on the shelling process, check my detailed recipe, or better yet : check my recipe video.
  • Pasta :
    • I believe spaghetti is a great choice here, or any long-shaped pasta kind, as the light sauce will cling to it.
    • What you must not compromise on is using Bronze Drawn pasta. Why so ? Because when processed this way, the pasta will present small irregularities that will enable the sauce to cling to it.
  • Fair warnings :
    • Please try to find really good quality sea urchins. It should taste buttery, fresh, salty but with a slight ‘sweetness’, and no fishy smell. On the other hand, bad sea urchins will feel spongey with a strong fishy taste not unsimilar to… what urine must feel like (sorry but it’s kinda true).
    • The taste for sea urchin differs from one person to another. Some recipes will call for as much as 12 sea urchins for two servings, some only 2. I personnally found that a little goes a long way : with 3 sea urchins, you will get a bold, yet delicate umami taste.

Cooking your pasta – Pieces of advice

  • Pasta :
    • Please salt your pasta water appropriately ! 10g of salt/liter is usually recommended.
    • As for most pasta recipe, we’ll finish cooking the pasta in the pan with the sauce. We’ll just put them in for the last half of their cooking time.
    • It is important that you start tasting 2 minutes before the package theoretical time, so that you get perfect al dente pasta.

Now come and cook !

Traditional Beef Bourguignon

As with pasta al ragù, I first met with the Beef Bourguignon at my school cafeteria.

It wasn’t perfect, as you can guess, but it was as beef bourguignon is supposed to be served : with a big ladle and no fuss. Any cook armed with patience and love for food can make it work. I’ve never had one that wasn’t satisfying, because this dish is, by itself, comforting and lovely ; and because the French are too proud of it to mess it up !

I crafted a recipe for this iconic dish, trying to research the subject as much as possible to make it authentic and tasty. I did not want to make a personal interpretation ; I wanted to bake THE beef bourguignon. What any person familiar with it pictures, in its ideal version, thinking about it. A meaty, flavourful and bold wine sauce, thickened but still liquidy ; some pull-apart, deliciously soft and moist beef ; a few vegetables, not mushy ones, bringing texture as well as taste.

My companion said -and he doesn’t say it without meaning it- that it was the best he had ever eaten. This is the biggest win for me.

If you ever feel like making a wonderful Sunday meal, a true crowd pleaser, do consider my Beef Bourguignon ! It will warm you up inside and out. It may be long, but as with most Sunday dishes, you essentially assemble everything, then let it cook for a few hours. The real active time for this recipe, except for checking occasionnally on your dish, is no more than 1 hour.

I chose to serve this Traditional Beef Bourguignon with coquillettes, which are tiny pasta. I find that it pairs wonderfully with this dish, and it’s also significantly simpler to boil pasta than to make a purée -which pairs very well with Beef Bourguignon, too, and is more traditional. You could also boil some potatoes, if you wish, or even use rice.

Traditional Beef Bourguignon – Recipe

Ingredients – Advice & key points

  • Beef :
    • I usually use a mix of beef chuck (on the fattier side) and Silverside/topside beef (on the leaner side), but you can also use beef cheek or any kind of stewing beef ; ask your butcher for a meat that will tenderize after a few hours of cooking on low temp. Ideally, ask for a mix of two meats, as leaner meats will bring a nice texture, and fattier cuts add depths of flavour.Here, you want to use some cuts that are collagen-rich. Gentle, long cooking transforms collagen fibers into melting gelatin ; this is how you get a pull-apart meat after a few hours.
    • In order to get the right richness for the sauce, it is important to add, besides your beef, the fattier lard.
  • Wine options :
    • Ideally, you’d want a Burgundy wine, but you also need a full-bodied, quite tannic wine, because it needs to hold the temperature and cooking length of your stew ; a rich Burgundy wine like this means you’d have to buy an expensive bottle ! Try to go instead for southern wines like Syrah wines,  from the Rhône Valley, which are aromatic, warm and slightly peppery. This will enhance the flavors and persistence of your sauce.
  • The classic recipe you’d be served in nice French restaurants uses pearl onions and will require you to cook them separately in a pan, as for your carrots and mushrooms. But personally, I’ve never seen a French cook his Bourguignon this way ! I tried it though, because I thought the taste would be worth the effort, and if anything I found it less tasty than the mix-it-all together version.
      • I simply recommend you to cut you onions and carrots in big chunks so that they don’t turn to mush ;
      • However, the mushrooms’ delicate texture requires you to add them towards the end. You could skip the browing and add them straight to the pot if you’re feeling lazy, they will turn quite soft with the sauce anyway.
  • Veal stock : I use store-bought here, since the large amount of meat already brings in lots of flavour. Feel free to use homemade if you can !

Cooking your Beef Bourguignon – Pieces of advice

  • Do not compromise on the cooking time ! Your stew won’t be tasty if you don’t cook it for a minimum of 2,5 hours, ideally 3 at least, possibly 4 or 5 if you want -or if your meat is not tender enough.
  • You can skip the roasting flour step though, as I didn’t find it to make a big difference in texture -it is supposed to cover you meat with a thin crust. However, do add the flour for the sauce’s texture ! Just wait for it dissolve right on the stovetop.

Let’s Bourguignon !

Quick Traditional Pasta e piselli

I must say I’ve never tried Pasta e piselli in Italy, and for a reason ; this is a recipe I discovered on an Italian Recipes page, with many natives sharing their childhood favourites.

You don’t get served pasta e piselli in restaurants ; your Nonna made it for you, if you were a lucky Italian child. It’s one of those dishes that comes together in minutes and requires mainly pantry items that you have on hand.

Basically, 4 ingredients are required : pasta, peas, onions, and Parmigiano. You can add or remove mint, or replace it with basil. You can add tomato sauce, or even pancetta, which is often the case in Neapolitan Pasta e piselli, for example ; every family has its own, proud recipe.

I kept it simple in this beautiful vegetarian recipe. The flavours are mild, but bright and fresh, and a satisfactory depth of flavour is added thanks to the Parmiagiano. The tiny-pasta-in-creamy-broth characteristic makes the dish so comforting, one you’d eat when you have a cold or feel blue.    

Quick Traditional Pasta e piselli – Recipe

Ingredients – Advice & key points

I usually go to Eataly to get the produce I need. If you don’t have one near your location, you can find fresh produce like parmigiano at your local Italian deli, maybe even your pasta. For pasta, if not available there, you should be able to order it online quite easily.

  • Pasta :
    • Try to find tubetti or ditalini pasta if you can, which are cut in short tubes.
    • Don’t worry if you can’t find it, as any short pasta will do.
  • Peas :
    • Do not use canned peas ! They are too fragile and will turn mushy, which is not what you want.
  • Feel free to :
    • Replace mint with basil or remove it altogether ;
    • Add diced pancetta if you wish (~200g for 5 servings), right before you put your onions in, and let it color a few minutes ;
    • Add tomato purée (~150g for 5 servings), by the end of you onions cooking time, and simmer 10 minutes before following through.

Cooking your pasta

  • Pasta :
    • This is one of the very, very few authentic “one pot” pasta dishes ! Yes, everything cooks quickly plus there’s almost no dishes to wash. Dream life.
    • Don’t forget to stir often once you add your pasta, like you would a risotto ; else it will stick to the bottom of the pot.
    • You can start tasting 2 minutes before the theoretical end time, so that you get perfect al dente pasta.

Now come and cook !

Simple Veggie Bibimbap

If I had to choose two cuisines to go by for the rest of my life, it would be Italian and Korean.

Yes, it is one of the dumb questions I like to think about and to ask around. This one is hard to answer when you love food, so you have to think carefully about the criterion you use.

Of course, it should be the cuisine that gives you the more emotions. But what is the rationale behind it ? For me, I found that there were two main reasons :

  • when the result is far superior to the sum of the parts ;
  • when instead of having your pleasure decrease as you eat it, you just can’t stop going back at it !

Bibimbap is one of those dishes. Rice, spinach, carrot, mushrooms ? Ok, boring !

But what a mistake ! Because what truly happens is a match between soft, comfy rice, and a mix of soft and crunchy vegetables, full of umami thanks to the healthy dose of garlic and sesame oil in the spinach, and the bulgogi sauce in the mushrooms ; to top it all, the bibimbap sauce is the magic link that binds it all together, hinting at the garlicky and sesamey flavours in the rest of the dish while adding tang and spice.

I love this dish. It can quickly become very time consuming to prep all veggies plus your meat though, so I narrowed it down to the three veggie side dishes that I find lend the bibimbap its typical savoury yet sweet, but also garlicky and sesamey flavour profile. Thanks to the mushrooms bulgogi, you won’t even miss the meat !

Simple Veggie Bibimbap – Recipe

Ingredients – Advice & key points

Some specific ingredients for this dish are basic Korean pantry items (soy sauce, sesame oil, rice vinegar, and gochujang). For some of them, you might need to visit an Asian store :

  • If you’re in Paris :
    • for my Korean items, I’m sure to find them (especially gochujang) at the K-mart near Opera (there are several others K-marts, check on Google) ;
    • you can also go to Tang Frères in the 13th (they have other stores in Paris but be careful, some are small, this one is large) or Paris Store in the 10th ;
    • ever since I moved to the 18th, I’ve been going to XP 16 or Chen Market, but those shops are slightly smaller, especially XP16, and you might not find everything you need. 
  • If you’re in France :
    • Paris Store has several shops across the country ;
    • you can also order online ! There are several online Asian websites you can order from.
    • For my foreign friends : I bet you can easily find some Asian shops around you or online, but if you can’t, message me with your location and I will try to find it for you !

Cooking – Advice & key points

  • To get a better texture and flavour, I recommend using a cast-iron or a stainless steel one when you cook your mushrooms ;
  • When you make a dolsot-bibimbap, meaning you heat it up in a stove-hot stone bowl – the ‘dolsot’, you even get the additional crunch of the rice, that will crisp up in the bottom of the bowl with the help of a bit of sesame oil. It is a nice addition, but you can do without -or put your rice in a nonstick skillet, and heat it up a few minutes before adding it to your bowls !
  • While the egg is traditionally added raw, you can choose to pan-fry it, especially if not using a dolsot, because the dolsot heat slightly cooks it when you mix it all up.

Got everything you need ? Let’s Bibimbap !

Tunisian-inspired tuna sandwich (“fricassé” in a baguette)

There are several small Tunisian shops around our place. One of them makes the best Mlawis and Fricassés in town. The Mlawis I will talk about some other time ; but I will tell you all about fricassés.

A fricassé is a traditional Tunisian savory doughnut. It is often served at Tunisian bakeries or fast-food outlets. The dough balls are seared in oil, then opened and stuffed with boiled potatoes, harissa, tuna, black olives, a hard-boiled egg, and méchouia salad (cooked salad with tomatoes, peppers, chillies and onions).

Yes, making a fricassé is a labor of love, and involves making and frying bread. I decided to try for a simpler fricassé-inspired recipe, where the bread would simply be some fresh baguette.

Since we’re sadly not yet is summer, I traded the méchouia salad with a simple cucumber salad with olive oil. I opted for a fresh feel in this sandwich, and added preserved lemon and cilantro to the filling. Other than that, I stayed true to the original recipe !

This was definitely a sandwich to be remembered, and we loved it here. The harissa brings the right amount of heat and the typical flavour that pairs so well with potatoes and olives ; the lemon, cucumber and cilantro make the sandwich refreshing, despite it being quite filling. This tunisian-inspired sandwich is also so satisfying in terms of textures, with its overall softness (soft potatoes, tuna, egg…) that contrast with the crunchy cucumber.

It is not the quickest sandwich to make because of the potatoes boiling time, but you’ll be all set within 45 minutes !

Tunisian-inspired tuna sandwich – Ingredients

You can find Beldi preserved lemons in local specialty grocery stores, especially small Arab produce stores.

Let’s sandwich !

Authentic Teriyaki Don (Chicken Teriyaki with Broccoli)

I bet you’ve already had teriyaki chicken at your local sushi joint. You know, the frozen, bland kind ?

Trust me, this recipe tops any takeaway you’ve had. Or if you’ve been lucky and have had teriyaki chicken from an authentic Japanese restaurant (I have, too), it at the very least matches your expectations.

The meat is juicy and moist, the picture of perfectly cooked chicken ; coated with the caramelized teriyaki sauce, slightly sweet yet savoury, you just can’t get enough of it.

As with most iconic recipes, it is as simple at it is great  :

  • Make your 5-ingredients sauce : you only need soy sauce, sake, mirin, sugar and water ;
  • Season your chicken thighs with salt, pepper, and slightly coat with potato starch ;
  • Cut into bite-sized pieces, then pan-fry !

This chicken is ready in less than 30 minutes. I chose to serve it on top of rice (hence the Teriyaki Don, meaning Teriyaki Bowl) along with blanched sesame broccoli with it. If you do too, you’ll be all set within 40 minutes.

Authentic Teriyaki Don – Recipe

Ingredients – Advice & key points

  • Try to buy quality, skin-on deboned chicken thighs. It is important to use chicken thighs, which are juicy and tender ; the skin crisps up and caramelizes beautifully, and protects the meat from the high heat, allowing it to remain juicy. Simply ask your butcher to debone it for you.

You could use chicken breasts if you don’t mind your meat being drier, or if you watch out for your fat intake.

  • You’ll find Soy Sauce, Mirin and Sake, which are basic Japanese pantry items, at any Asian store around you. The potato starch might be trickier to find ; if it is, replace it with cornstarch, that you’ll find at your grocery store.
    • If you’re in Paris :
      • you can go to Tang Frères in the 13th (they have other stores in Paris but be careful, some are small, this one is large) or Paris Store in the 10th ;
      • ever since I moved to the 18th, I’ve been going to XP 16 or Chen Market, but those shops are slightly smaller, especially XP16, and you might not find everything you need. 
    • If you’re in France :
    • For my foreign friends : I bet you can easily find some Asian shops around you or online, but if you can’t, message me with your location and I will try to find it for you !
  • Be careful to use Toasted Sesame Oil, not plain sesame oil, which is much more intense.

How to eat your Chicken Teriyaki

  • You can make a Teriyaki bowl like I did, with rice and sesame broccoli ;
  • You could also simply serve the chicken on a plate, with the sides you want (I’d recommend other blanched/steamed vegetables or Asian salads).

This recipe works great as a Bento for lunch, like I did here ! Don’t hesitate to make a larger batch to serve the next day.

Let’s dig into it !

Quick Salmon Poke Bowl

Ever since I started working, Poke Bowls have become one my go-to. They’re filling, healthy and, more importantly, delicious ! I usually have it once a week.

However, you can tell that the salmon, especially recently as inflation has taken its toll, is rarely top-quality, and the sauces leave room for improvement. Plus, it is much cheaper to make it at home, with better quality ingredients, and precisely how you want it !

I made a quick salmon poke bowl here, to minimize prep time, with what I see as essentials :

  • vinegared rice as a base,
  • avocado for the flavour and buttery texture it brings,
  • mango for a touch of sweetness that balances the savoury flavour profile,
  • cucumber for the crunch,
  • some tasty salmon, quickly marinated while you cut your veggies in the same poke sauce you’ll pour at the end.

You could definetely replace the salmon with any other fish you’d like -tuna and white-fleshed fish such as sea bream, sea bass or even cod work well here. If using sea bream or sea bass, don’t let it marinate for more than 20mn (the fleshes are more fragile here).

What makes the difference is the sauce, a simple but highly effective association between soy sauce, sesame oil, rice vinegar, agave, garlic, ginger, and chilis if you’re up for a bit of spice.

My companion said it was the best poke he’s had ; my work here is done ! *Poke drop*

Quick Salmon Poke Bowl – Recipe

Ingredients – Where to find them

Some ingredients for this dish are basic Asian pantry items (soy sauce, sesame oil, rice vinegar). You should be able to find those in traditional grocery stores, without needing to visit an Asian one.

Ingredients – Advice & key points

  • Do buy fresh, sushi-grade fish. I go to the fishmongers’ and tell him I’m going to eat it raw. Straight after buying it, I always put in in the freezer for 24 hours ; it kills any possible Anisakis, which are parasites that can really hurt you. Then let it defrost overnight in your fridge.
  • Please buy ripe avocados and mangoes. If they’re not, your poke simply won’t be tasty.
  • You could skip the vinegar/sugar in the rice if you’re feeling lazy. I sometimes do, and it doesn’t make a real difference considering the powerful sauce.
  • Conversely, definitely feel free to add other ingredients ! The ones I find best suited for a poke are :
    • raw or pickled red cabbage,
    • edamame, wakame (you can find them both frozen in Asian stores),
    • white or red onions,
    • radishes,
    • kimchi.

Got everything you need ? Let’s Poke !