Post Type ArchivesRecipes

Festival Couscous Salad

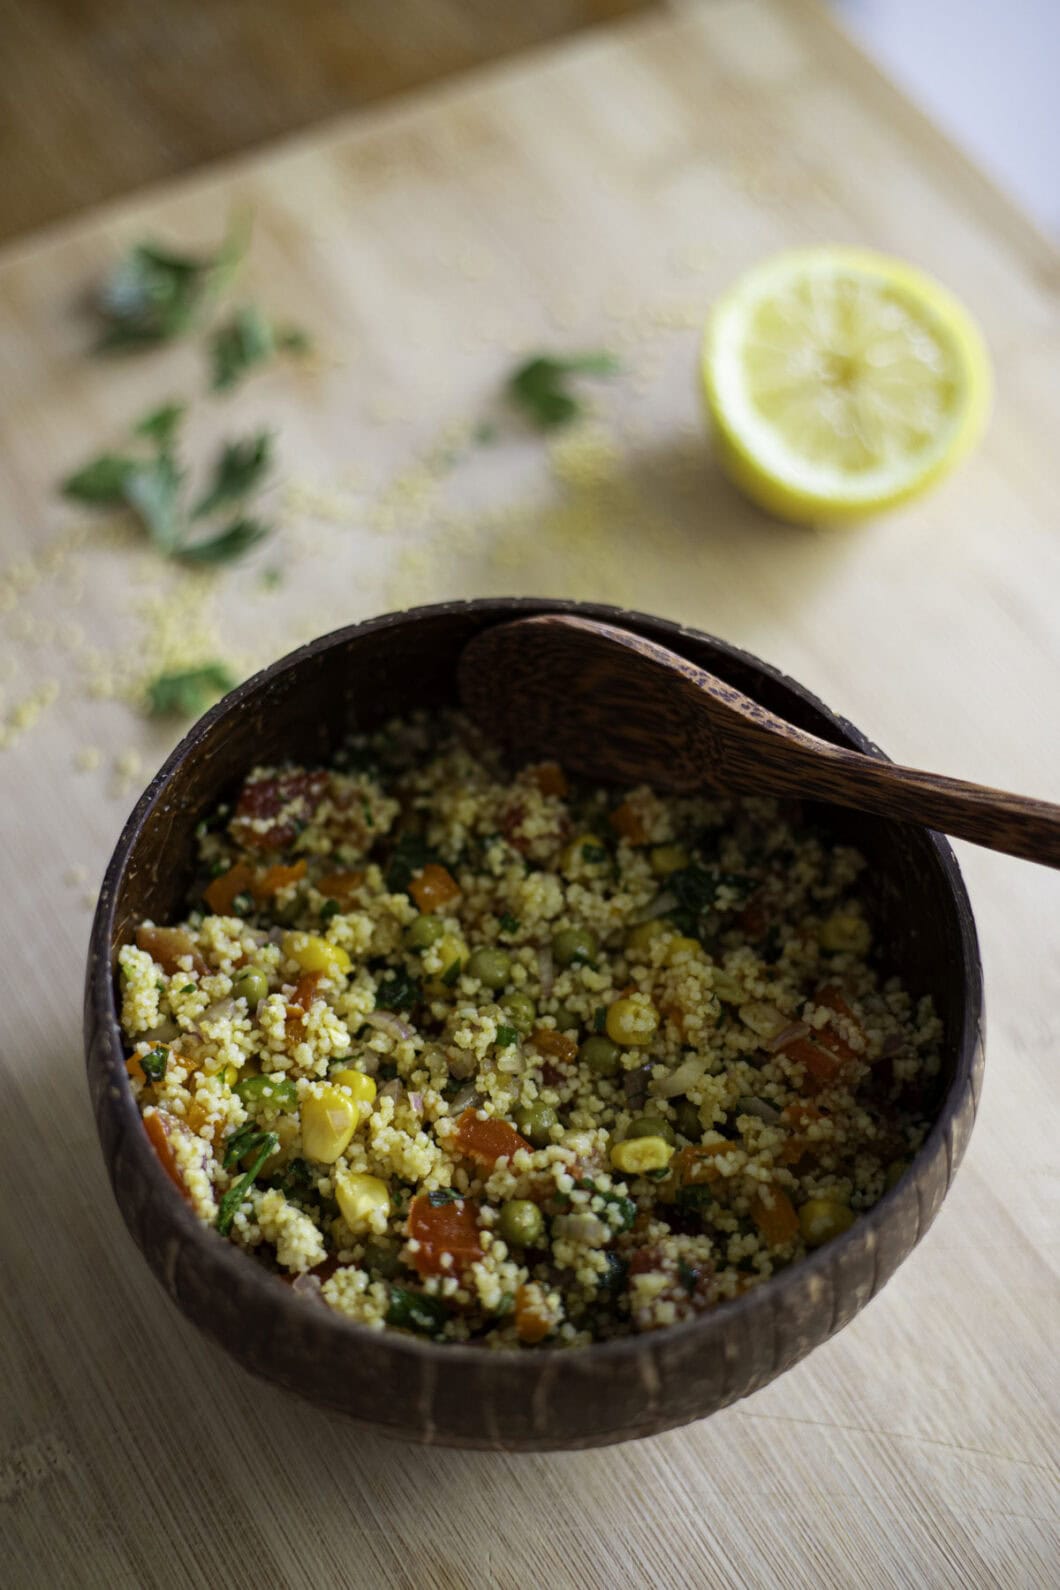
I first made this Couscous Salad at Garorock, a few months ago.

We mostly ate at the festival’s food stalls, but figured our tummies wouldn’t be very happy with a sausage/fries/kabobs diet for 4 full days. Therefore, we were looking for healhy-ish things to prep at the camping… without being able to heat anything up, or to refrigerate stuff.

Before we went grocery shopping, our friend Laurent told us that you could prep couscous with room-temp water. Bingo ! Along with couscous, we chose a mixed vegetable can to get those greens in, and bought some mackerel in oil, lemon & thyme for the protein and to get an easy sauce -as olive oils are mostly sold in glass bottles, which are forbidden on festivals grounds.

This is barely a recipe, I know, but I figured it might be helpful :

  • like us, if you’re going to a festival,
  • if you’re a broke student looking for something cheap and nourishing,
  • on a lazy summer night -3mn prep, no heat, the dream.

It is not worth a classic couscous salad of course, but sometimes it’s about real life cooking and a me-needs-eating-quick situation.

Festival Couscous Sald – Recipe

Ingredients – Where to find them

No difficulty whatsoever here !

Ingredients – Advice & key points

  • You don’t really need any salt or olive oil, because of the salt canned goods contain, and the olive oil in the canned fish. Feel free to add some though if you can !
  • Of course, considering everything is made out of canned/boxed goods, there are countless changes you could make :
    • Fish : tuna, sardines, mackerel, shrimps… Anything works ! Do buy fish fillets if you can -it’s easier to make with boneless fish.
    • Veggies : choose any canned ones you like ; you could also go for beans, lentils, etc.

Got everything you need ? Let’s go !

Pink Ceviche

Ever heard of how biscuits were invented ? Well, the baker mistakenly baked some cakes twice.

This Ceviche wasn’t supposed to be pink. I accidentally put twice the amount of red onion that was intended. But this is the beauty of cooking ; it was still perfecty delicious, plus quite pretty if I do say so myself !

Ever since I came back from Yucatan, ceviches have been on my mind. I had already eaten ceviches in France, but none of them compared to what you can get in Mexico. Even this recipe is not up to their level -I need to get my hands on some Ají Limo, a pepper that is usually used in ceviches- but I wouldn’t post it if it wasn’t a close proxy !

See for yourself the colours and the beautiful simplicity of this dish : fresh raw fish ; a flavourful fishy broth, zingy and fresh from all the celery, ginger and lime ; and of course, the king cilantro ! Lots of flavour and power that will conquer your heart, even if you’re not a fish lover. The texture department is not lacking, with multiple sensations as you gulp the broth, get a moutful of soft fish, followed by the crunch of thinly sliced raw onions.

My ceviche has some mixed influences, mainly Peruvian, the home country of ceviches, but also Mexican, due to my own ceviches’ experiences. In Peru, steamed sweet potatoes are often added on the side. I chose to add cubed sweet potatoes directly onto the fish, along with some tomato, which is more of an ingredient you’d find in Mexican ceviches as they tend to include more veggies. You can skip those additions if you like, but I find them quite nice when serving ceviche as a meal and not a starter.

Pink Ceviche – Recipe

Ingredients – Pieces of advice

  • Regarding fish, you can choose any of your fishmongers’ freshest, white-fleshed fish. Try to pick one that has firm flesh so that it doesn’t get mushy with the acidic marinade. Common choices are sea bass, snapper, halibut, flounder, tilapia, or even cod. You can also choose raw shrimps if you prefer !
  • When it comes to the potential bitterness, here are 2 tips to avoid getting an overly sour marinade :
    • When squeezing your limes, don’t press all the way until the end ! If you press it until the final drops come out, the end result will be more sour.
    • Salt is your friend here ! It is important to salt both your marinade and your fish properly, as it makes the acidity seem less sharp and more palatable.
  • If you don’t want your Ceviche to be spicy at all, skip the green chili pepper, or at least remove its seeds.
  • I’ve also tried to let this Ceviche marinate 2 more hours, which is a more Mexican-inspired Ceviche version ; I found it really interesting too, with flavours that were more infused, and a softer fish texture. If you don’t enjoy your raw fish’s texture, which is on the firmer side, do try this version !

Off to your kitchen now !

Tomatoes, mozzarella & nectarine Salad

This is another quick summer recipe, with no heat needed. Yet, this salad is nothing boring.

It’s basically a simple Caprese salad ; tomatoes, mozzarella, olive oil, salt and basil, what more do you need ?

Well, nothing really, but a bit of nectarines & shallots bring a slight sweetness and a crunchy twist.

Tomatoes, mozzarella & nectarine Salad – Recipe

Ingredients – Advice & key points

  • As always, with recipes as simple as these, I recommend your focus to be on the ingredients’ quality. If you do, it instantly becomes a top-notch dish. I would buy :
    • in-season, quality tomatoes, such as Beef Heart tomatoes, Crimean Black tomatoes, or Green Zebra tomatoes ;
    • some decent Mozarella. I adore Mozzarella di Bufala, made out of buffalo milk instead of cow’s milk for the Mozzarella Fior di Latte ; its texture is creamy and soft, more delicate than the Fior di Latte which is on the firmer side ;
  • Also, to make the perfect salad, don’t forget :
    • to season everything properly with enough salt and pepper, and ;
    • ideally, to drizzle your salad with a quality olive oil, which is great to have around, in particular for all your uncooked dishes !

Let’s get this upgraded Caprese done !

Veggie Couscous Salad

Out of respect for our Lebanese friends, I am not calling this dish tabbouleh. But it is definitely tabbouleh-inspired.

I always adored tabbouleh. In France, it is a classic summery dish that we like to eat, mostly as a side for barbecues or summer gatherings. It is so popular that small grocery stores always sell boxed tabbouleh in the fresh section, year-long. I used to eat it quite a lot as a poor student.

But, careful ! The tabbouleh we eat here would make my Lebanese friends angry, as there’s almost no parsley in it, and you mostly get couscous and veggies. I was lucky enough to try what was as close to the authentic tabbouleh as you can get when I traveled to Turkey with my parents. I remember it as if it was yesterday ; the herbs -there were several of them- made all the difference, and the fragrances were amazing. Since then, I’ve tried other Lebanese tabbouleh, but I’ve always found the parsley quite overpowering.

Instead of reproducing the classic recipe, I felt like making a hearty couscous salad, that could be eaten as a main, with lots of different veggies and several condiments and spices to make the flavours pop. 

I was very pleased with the end result. Even my companion, who’s really not into tabbouleh, kept saying how delicious it was. Plus, the recipe is budget-friendly and healthy, yes sir !

Veggie Couscous Salad – Recipe

Ingredients – Where to find them

Those ingredients are easy to get from your typical grocery store, and for those which aren’t, you can easily skip them or replace them !

Ingredients – Advice & key points

  • If you don’t like it spicy, just remove the green bell pepper and the green harissa ! If you like it a lil bit spicy, only keep the harissa as it is quite mild.
  • Replace the green harissa with another hot sauce if you can’t find it ! I usually find it in grocery stores or specialized African stores.
  • Feel free to play around with the ingredients used !
    • Replace the veggies with what you have on hands ! You could add cucumber, replace shallots with onions, or add radishes, for example.
    • Go for what feels right for you when it comes to herbs ! You could use one or two instead of three, or add cilantro instead, for example. But definitely use a large amount ; it’s what brings this couscous salad to the next level.
    • You can remove the curry powder or add other spices !
    • If you don’t feel like it, remove the canned peas and corn. I find that they bring a needed sweetness though, that balances out the tang from the lemon and green harissa.

Come now, let’s get your hands dirty !

Veggie Soba Noodle Salad

I’ve had a real Japanese cooking phase. I was all about authentic Japanese recipes -I’m talking yakitoris, miso salmon, onigiri, the real deal- and I scrolled online to find the most delicious ones.

That’s when I found out about soba noodles. How could I have missed them ? Men, these noodles are delicious. They’re made out of buckwheat flour, and really have a taste and texture of their own. They have this delicate nutty aroma, with a taste that reminds me of sesame. I adore the texture : smooth, slighlty chewy yet quite firm. They’re good for your health, too !

With their grainy texture and their slight bite, these noodles are perfect for salads. I respected the traditional basis for this salad’s dressing, which shoud revolve around sesame, but I wanted to craft a Japanese dressing recipe with zingy, fresh flavours, to make for the perfect summery soba salad. That’s why I used my wasabi and ginger friends, for a small spicy kick, and some rice vinegar and lime for the tang.

I was very happy with the end result, and it made for a nice change from our classic Western salads, with lots of textures -the chewiness from the soba, the crunch from the carrots and cucumbers- and a real depth of taste with sesame combined to tangier flavours. Love it ! I know you will, too !

Veggie Soba Noodle Salad – Recipe

Ingredients – Where to find them

The most necessary ingredients for this dish are basic Asian pantry items (soy sauce, sesame oil, rice vinegar, wasabi). You should be able to find those in traditional grocery stores, without needing to visit an Asian one.

Ingredients – Advice & key points

  • You will find Soba noodles at an Asian store, or online. You might find 2 types of soba noodles :
    • Ju-wari Soba is made of 100% buckwheat flour. It is said to have a strong buckwheat flavour, but those are the ones I’ve always used (without knowing), and trust me : the flavour is definitely not overwhelming, I still find it quite mild.
    • Hachi-wari Soba is made from 80% buckwheat flour and 20% wheat flour. If you’re worried about disliking the buckwheat aroma, you can still pick this one !
  • Careful, you must not overcook the soba noodles to get this nice bite and slight chewiness. Respect the packaging instructions ! It is also important to rinse thoroughly the soba noodles right after they’re done, to remove the excess starch. It will prevent the noodles from sticking together.
  • You will find Edamames at Asian stores in the frozen section. If you don’t, simply skip it !
  • This recipe is versatile ! Feel free to remove or replace some ingredients. The ones I find best suited for this recipe are the following :
    • raw or pickled red cabbage,
    • bell pepper,
    • green or red chili pepper,
    • white or red onions,
    • tomatoes,
    • arugula,.
  • If you’re not a vegetarian, the salad would also work well with shredded chicken.
  • I recommend serving this dish freshly out from the fridge, if possible !

All set ? Let’s make this Soba Salad !

Spicy Tuna / Kimchi Onigiri

In Seoul, all I wanted to eat for a quick lunch were Kimbap. There are delicious, healthy, and filling, and I love them.

Nevertheless, they’re a bit time-intensive to make. What about their Japanese counterpart then, Onigiri ? Those are Japanese rice balls, often shaped into triangles, and wrapped partially in a sheet of nori (seaweed).

Well, of course it would be simpler. And equally delicious. I love the minimalistic approach of Japan when it comes to cooking ; I’ve learnt that the Japanese principle of wabi-sabi, which finds beauty in simplicity and imperfection, influences many aspects of Japanese culture, including cooking. The idea is to appreciate the purity of the ingredients and the craftsmanship in preparation without unnecessary embellishments.

The Onigiri recipe follows this principle. You won’t have any authentic Japanese filling that contains more than 3 to 4 ingredients. Yet, I kid you not, the end result is much more than the sum of its ingredients.

When you bite into a pretty Onigiri, you get the moist, fluffy rice, that acts as a pillow of comfort. This rice itself must be well-seasoned, and for that purpose, I draw out my ultimate weapon : furikake. It is a popular Japanese seasoning powder which is typically used over rice, and often includes dried fish like bonito flakes, sesame seeds, seaweed, salt and sugar. The one I used is Furikake Piritto Umai – Togarashi, with red pepper and bonito flakes and I absolutely adore it. But feel free to find your favourite amongst the huge variety that exists !

Then for the filling, the most authentic ones are the following :

  • Japanese pickled plum (umeboshi),
  • Bonito flakes moistened with soy sauce (okaka),
  • Salted salmon (shake),
  • Tuna mayo,
  • Simmered seaweed (kombu),
  • Salted cod roe (mentaiko).

Being a basic Westerner, I’m a huge fan of the simple tuna mayo version. I simply decided to make it mine by adding some Buldak hot sauce (for my spicy ramen lovers, you know what I’m talking about!!) and chives.

I must admit I’m not too fond (yet) of the authentic Japanese vegetarian versions of Onigiris with umeboshi or kombu. Therefore, I thought of my vegetarian friends and made a simple Korean-Japanese fusion one, with Kimchi !!

Spicy Tuna / Kimchi Onigiri – Recipe

Ingredients – Advice & key points

  • It is important to use short-grain rice here, so that it is sticky enough to shape the Onigiris. Nowadays, you can find it in your grocery store !
  • Try to pick an oil-based canned tuna. I know, oil + mayo seems unhealthy, but remember that the oil is drained and that you barely put a tablespoon of filling per onigiri. I’ve tried the recipe with a non-oil-based canned, and it was definitely less tasty.
  • For the Buldak sauce, you’d likely need to go to an Asian store to find it. But simply use your usual hot sauce instead !
  • Also, if you want to buy :
    • Onigiri molds, and
    • Onigiri Packagings,

you’ll either find them in Asian stores or online !

Recipe – Advice & key points

  • I advise you to use onigiri molds for this recipe. I’ve already formed my onigiris by hand, and you can definetely do it too, but it takes more time to make and is more irregular than the mold version.
  • You can keep the Onigiri in the fridge on the day you make them, or even overnight, but definitely use :
    • a first layer or cling film to wrap them,
    • then, 1 (or 2!) kitchen towels to wrap them again, so that they’ll be protected from the excess cold ! The rice becomes too dry with the direct cold effect.
  • I don’t recommend keeping it longer than overnight. If you do, simply make grilled Onigiri (Yaki Onigiri) instead ! Brush the leftover onigiri with soy sauce or miso paste and grill them in a skillet until they develop a crispy, golden-brown crust.

All set ? Let’s dig into it !

Lemony sweet shortcrust pastry

This lemony sweet shortcrust pastry recipe will be perfect for your sweet pies ! I love this as a base for fruit pies with custard, such as a delicious summery strawberry pie.

You can even directly use it to bake some sablés, which are delicious, buttery French biscuits.

This sweet shortcrust pastry is easy to make, and the supermarket ready-made versions cannot compare to this homemade one. Try it for yourself !

Lemony sweet shortcrust pastry – Recipe

Ingredients – Advice & key points

  • You need to use room-temp butter, not melted ! Don’t even use a microwave to get it to room temp faster, it might ruin the dough’s texture.
  • Do not knead the dough too long before putting it into the fridge, else the dough might harden.
  • I like to flavour this dough with lemon zest, but this is optional.

Cooking & Serving your Lemony Sweet Shortcrust Pastry

  • Bake at 180°C for around 15 to 20mn. I advise you to put :
    • some parchment paper on your pies so that the dough doesn’t get too brown, and ;
    • a few dried beans or lentils on this foil so that the dough doesn’t swell up.
    • after 10 minutes, remove your parchment paper and beans/lentils and the pies will finish cooking nicely !
  • Garnish with anything you wish for !

Upgraded French Jambon-Beurre-Emmental

I can’t resist a good classic. But I also always found (unpopular opinion here) that the classic jambon-beurre, with its 2 simple, soft-tasting ingredients -sometimes 3, with cucumber pickssoft and comforting. But a whole sandwich is a lot, and I couldn’t enjoy it until the end.

This is why I usually go for the Jambon-Beurre-Emmental with crudités in bakeries ; you also get some additional crunch and freshness with tomatoes and salad, which also pair well with some cheese.

I wanted to go a tad further though, and find ways to add tang to this sandwich, while keeping it simple. Since I don’t like pickled cucumber, I used pickled onions instead ; they bring that tang, plus the nice, sweet taste of onions. I love it. And, besides butter on the bottom part of the baguette, I used a teaspoon of mustard on its top part.

The end result was absolutely scrumptious. And ready within 5 minutes. That’s an amazing sandwich, and with a time-to-pleasure ratio you cannot beat !

As always, for recipes as simple as this, all depends on your ingredients’ quality :

  • a good bread : here, I’m lucky enough to easily find some baguette, but if you cannot find a decent one, choose your freshest, locally baked bread ;
  • a quality ham : I adore the Prince de Paris ham, the last in Paris to be traditionally made. It’s not just trendy, and you can really taste the difference. But simply choose your best local ham ! I recommend it sliced almost paper-thin, which I find tastier ;
  • in-season, quality tomatoes, such as Beef Heart tomatoes, Crimean Black tomatoes, or Green Zebra tomatoes ;
  • some decent young Emmental (must not be too hard and sharp). If you cannot find some around you, simply use an equivalent cheese such as young Gruyère or young Comté, or Maasdam, Jarlsberg, Leerdammer
  • use any pickles you like the most to bring out some tang !

Don’t forget to season your tomatoes with salt (and pepper if you please !)

As with the Italian Pesto sandwich, this is barely a recipe ; once you know the ingredients, you simply assemble them ! That’s it !

Let’s dig into it !

If you’re into sandwiches like I am, check out my Tunisian-inspired tuna sandwich, or my Raclette sandwich, and many others here !

Korean Stir-fried Sausage

You will likely not find Korean stir-fried sausage served at a restaurant anywhere but in Korea.

I had almost forgotten about it, too ! It was sometimes served as a banchan (a small Korean side dish ; you get several of them with every meal) at the lunch cafeteria or in restaurants. I was always happy when a small plate of cute mini sausages and bell pepper appeared ; although quite simple, with a straight-forward ketchup and gochujang sauce, the taste was comforting and you kept wanting more of them.

In our modern lives though, I dare you to find the time to cook a main dish, 3 to 4 banchans and a soup, which is a basic Korean meal ! Therefore, I consider this Korean stir-fried sausage as a main dish, that you can accompany with rice.

Korean adults like to pair these sausages with beer. I concur !

Korean Stir-fried Sausage – Recipe

Ingredients – Advice & key points

  • Sausages:
    • I recommend using mini Vienna sausages for this dish, which you might find at a Korean store ; but you can really go for any kind of mini sausages you can find in your country, so long as they’re quite soft and bouncy instead of hard and crumbly ! Yes, we want overprocessed meat for this one. This is not a healthy meal, I must comfess !
    • The small size and the three cuts on your sausages are not just for cuteness purposes ; this will get you easy-to-grab, saucy sausages that will be pleasant and handy to eat !
  • This dish is spicy, but not crazy spicy. If you want to lower the heat, reduce or remove the Gochujang amount, and replace it with the same amount of ketchup !

How to eat Korean Stir-fried Sausage

  • You can eat it over a bowl of rice, or with rice on the side.
  • Feel free to serve this dish as an appetizer -or a banchan within a true Korean meal, of course !
  • You can definitely eat it cold, but I like it better quite warm.

Let’s dig into it !