Post Type ArchivesRecipes

Korean Breakfast Sandwich (Gilgeori Toast)

In the French corporate world, it is a tradition to bring breakfast -usually croissants and pains au chocolat- if you’re to leave a company you’ve worked for.

On the last day of my first internship, I respected this tradition. Except, instead of grabbing the usual viennoiseries, I bought my personal favourite for everyone ; around 20 Egg Mc Muffins from the nearest Mc Donald’s. I believe they all thought I was some sort of lunatic.

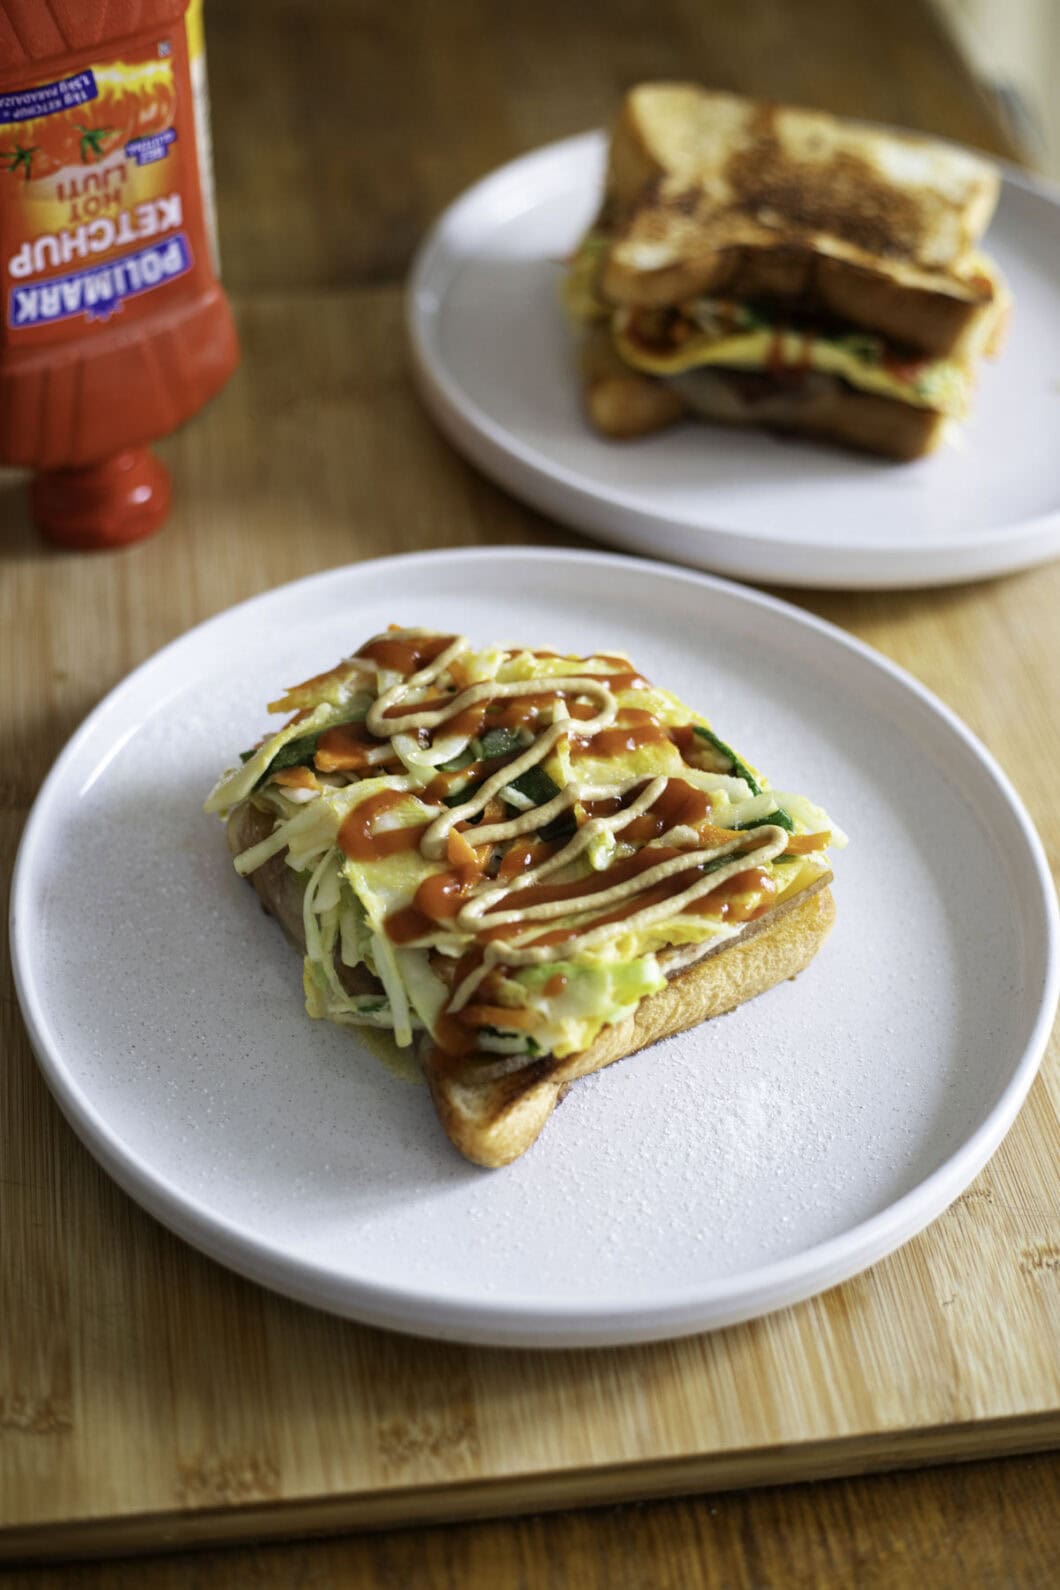
I have a strange passion for egg sandwiches. So, when I went for a walk one morning in Korea and saw a street vendor making an unknown kind of egg sandwich, I went straight for it.

It was delicious, with an interesting sugary twist, and some additional crunch and taste from grated veggies.

It is also particularly simple to make, without any kind of specific Korean ingredients, except for the Japanese/Korean milk bread. I strongly advise you to find some, as the recipe is really not quite the same with ordinary sandwich bread.

Korean Breakfast Sandwich (Gilgeori Toast) – Recipe

Ingredients – Advice & key points

  • This egg sandwich can easily be made vegetarian, by removing the ham. The ham and cheese that I chose to add are optional ; the original recipe does not necessarily include them.
  • In order to find some milk bread, you can visit an Asian store or a Japanese or Korean bakery if you have one near your location.
  • I find this sandwich delicious either eaten hot right away, or cold from the fridge ; if you have some leftovers, try and refrigerate them ! It won’t be as crispy, but the cold makes the sandwich feel fresher/lighter.
  • Good to know : this recipe makes for two large sandwiches. Half a sandwich fills me up, unless I’m really hungry.

Let’s dig into it !

If you’re into authentic Korean food, check out my GOAT Kimchi Jigae, too !

Pesto Pasta

Since I had already posted a pesto recipe, I wasn’t sure it was worth it to post a pesto pasta recipe. You just pour it in, mix and serve, right ?

Wrong.

There’s not much to do indeed, but you have to keep in mind 2 things :

  • Never heat up your pesto ! It will lose its flavour.
  • Add some pasta water to your sauce !

Simply set aside a glass of starchy pasta water by the end of the pasta cooking time. You will add to the drained pasta in their cooking pot, with the heat turned off. As you mix your pesto in, the starchy water will emulsify with the pesto oil, making for a smooth and glossy sauce.

I love to make this recipe either with spaghetti or short pasta such as trofie or fusilli.

Ready ? Make your pesto, then treat yourself to this 15mn recipe !

Mortar-and-pestle Pesto

As for almost all my Italian food love stories, this one started when I visited the country.

It wasn’t in some fancy restaurant ; neither was it in metropolitan Italy, but in Sardinia. With my companion, we wanted to go to the beach, and it was nearing noon. We fetched, in a small nearby supermarket, a few items to make a tomato, mozzarella and pesto sandwich -I might post it some day, because this simple sandwich is beautiful.

As we strolled through the aisles of the supermarket, I noticed some fresh, refrigerated pesto ! This isn’t commonly available in French supermarkets ; we only get pesto from sterilized glass jars. I bought it with excitement -I love shopping for food in foreign supermarkets, as it gives me truer sense of what the locals eat.

I tried it before spreading it on the sandwich. Damn it !! The difference with our usual French ready-made pesto was astounding. The basil flavour was so much fresher ; you could also taste the delicious olive oil flavour, and the garlic.

And it wasn’t even the real deal, as it was still ready-made. Imagine the flavour when freshly handmade, using the best ingredients you can procure.

There was no turning back from this, and my companion gifted me a mortar and pestle for my next birthday. To this day, I make my pesto from scratch.

I hope you’ll make yours too.

Mortar-and-pestle Pesto – Recipe

Ingredients, process – Advice & key points

  • Olive oil : As this ingredient is possibly the most important in this recipe, I strongly recommend using a good quality olive oil.
  • Basil : Try to make this recipe in summer, as off-season basil is just not tasty.
  • Why use a mortar and pestle, you might wonder, and not a blender ? The answer is twofold :
    • if using a hand mixer or blender, the blades will heat up the basil, which makes it lose some of its flavour ;
    • crushing and grinding frees more flavour than simply cutting. Try it with a piece of garlic if you wish ; you will taste a clear difference between minced garlic and crushed garlic.

Using your pesto – Pieces of advice

  • Very useful trick : Make a batch of pesto, then freeze your leftovers easily ! You just have to use an ice cube tray ; I usually use my pesto for a 2-persons recipe, then make around 6 to 8 pesto cubes that I put in the freezer. 2 cubes represent a good amount per person.

This way, I can have tasty pesto year-round.

  • How to use your pesto :
    • With pasta :
      • Important : Do not heat your pesto ! It will lose its flavour.
      • When your pasta is cooked, turn off the heat. Set aside a small amount of pasta water.
      • Drain, then add back your pasta to your pot. Add your pesto (about 1 heaped tablespoon per person). Add a bit of pasta water, and emulsify by stirring quickly.
      • Please salt your pasta water appropriately ! 10g of salt/liter is usually recommended.
    • In sandwiches :
      • My favourite pesto sandwiches are :
        • Mozzarella, Tomato and Pesto (vegetarian) ;
        • Arugula, Mozzarella, Tomato, Parma ham, Pesto.

Now come and cook !

Authentic Thit Kho Thieu (Caramelized Black Pepper Pork)

This dish is precious. As I read online comments and articles in my recipe creation process, I discovered that it was a favourite among many Vietnamese, a madeleine de Proust of sorts.

It’s like the national equivalent of a Carbonara. Some of Thaïland’s most prized ingredients -pork, fish sauce, garlic and rice- are gathered in a simple recipe, with a result that is far superior to the sum of its parts.

Forget about your classic caramelized pork recipe, overly sugary and lacking depth. Here, the flavours are neat and delicate, and you can’t stop getting back at it. The balance between sugary and savoury is on point, with just enough sugar to offset the strong Nuoc Mam flavour; brighten it up with some minced shallots and scallions, a bit of fresh thaï pepper if you like, and get ready to enjoy !

For the record, this recipe is not the better-known Thit Kho Trung (Caramelized pork with eggs), a fellow Vietnamese recipe that is even more comforting (hello, fatty pork belly) but takes longer to cook. I shall make a recipe for it someday !

Authentic Thit Kho Thieu (Caramelized Black Pepper Pork) – Recipe

Ingredients – Where to find them

Some ingredients for this dish might require you to visit an Asian store, but you shall find them easily as they remain quite basic Asian pantry items (soy sauce, fish sauce (Nuoc Mam), scallions, Thaï pepper).

  • You might have a tad more trouble finding coconut water, but you can definitely skip it – I did once or twice and it didn’t alter the final result.
  • Similarly, you might not find Phu Quôc black pepper  ; you can simply replace it with your usual black pepper.

Recipe – Advice & key points

  • It’s ok if the sauce is quite runny ; it’s not supposed to thicken much.
  • I advise you to serve it over rice so as to pour your sauce all over it. The addition of sliced cucumber adds a nice touch of freshness ! You can also add some pickles if you have some.
  • I recommend using pork shoulder (échine de porc, for my French friends) for this recipe, as it has a nice muscle to fat ratio resulting in a satisfying tenderness. You can use pork belly instead if you wish !

Off to the kitchen now !

Saint-Pierre (John Dory) in Galanga dashi

This is a dish that’s heavily inspired from an appetizer I found in a French magazine (Elle magazine), I must admit. But it made me imagine a full main that I wanted to cook right away.

Thaï cooking, with its procession of fresh, peppery, lemony herbs and roots, can bring life to any broth. When you pick a broth that already has lots of depth -hello, Dashi friend-, you’re in for a beautiful ride.

See for yourself the colours and the beautiful simplicity of this dish : thinly sliced fish, turnip petals ; a clear, flavourful broth ; and a variety of zingy herbs. Lots of flavour, but all very delicate.

Add a bit of rice and steamed sweet potatoes -that you can simultaneously cook in your rice cooker, or in a pot ; you have yourself a truly satisfying meal, that also happens to be healthy. What’s not to love ?

Saint-Pierre (John Dory) in Galanga dashi – Recipe

Ingredients – Advice & where to find them

  • I recommend you to go to a well-stocked Asian store, in order to find kombu and katsuoboshi, and more particularly galanga, which can sometimes be tricky to find ! I was able to find some frozen, pre-sliced one. You can also get it fresh from some Asian stores, too (it looks like ginger, but is more delicate and lemony in taste).
    • If you’re in Paris :
      • you can go to Tang Frères in the 13th (they have other stores in Paris but be careful, some are small, this one is large) or Paris Store in the 10th ;
      • ever since I moved to the 18th, I’ve been going to XP 16 or Chen Market, but those shops are slightly smaller, especially XP16, and you might not find everything you need. 
    • If you’re in France :
    • For my foreign friends : I bet you can easily find some Asian shops around you or online, but if you can’t, message me with your location and I will try to find it for you !
  • On another note, feel free to replace the Saint-Pierre (which is really quite expensive : I personnally paid around 40€ for 300 grams of fillet, which translates to 1kg of fish) with sea bass (still costly but far less, at least where I live), or even cod ; really, any white-fleshed fish will do. Please choose a fresh one though, since the fish is only cooked through the hot dashi.
  • If you have doubts regardings which herbs to use, I’d say my absolute favourite here is Thaï basil, whose flavour pairs so well with the lemony galanga. Thaï basil and cilantro would suffice here for me, the rest is optional. But feel free to experiment with other herbs !
  • The key here to only spend 40 minutes cooking is to prep other things during the resting or cooking times. For example, make sure to launch your rice and sweet potatoes, if using, before you start your dashi. Also, use the 15 minutes dashi resting time to cut your fish fillets in thin slices.

Off to your kitchen now !

30mn French-Thaï fusion beef tartare

My companion’s favorite dish is steak tartare. Almost every time we go to a French Brasserie, he picks this dish.

Between mine and his, I’ve tried a great many deal of tartares along the way, and have had good suprises with funky tartares. I remember a beef and avocado tartare, which seems odd but was really great, and a garlic beef tartare, for beef lovers, with a pleasant hint of garlic, some salt and olive oil, and virtually nothing else.

While I do like the classic French version, I liked unorthodox tartares better. Since I’m in love with cilantro and all things fresh and crunchy, I went down this pairing road, and it did not take long for me to picture my idea of a perfect tartare ; lots of herbs and shallots, an acidity and spice kick, and a bit of crunch with fried onions. That’s it ! The French-Thaï tartare was born.

30mn French-Thaï fusion beef tartare – Recipe

Ingredients – Advice & key points

  • Pay attention to your beef quality ! Ask your butcher for the best option, as it depends on the amount you want and the parts they have available. For example, here I used “surprise de boeuf” (a small part on top of the shoulder) because I didn’t need much, and it was perfectly tender and tasty for a reasonable price. As a rule of thumb, know that you can rely on tenderloin (expensive but tender and minimal connective tissue) and sirloin (cheaper option that is perfectly fine).
  • Everytime I asked for meat to be eaten raw, the butcher went to the backroom to fetch the freshest bits, which were visually redder than the meat in the window. If your butcher doesn’t, feel free to ask him to !
  • I like to dice my tartare meat myself, which allows you to do this at the very last minute, and with the thickness you want -I personnally want small dices, but not ground meat. Don’t worry, it’s not complicated at all, and only takes a few minutes. Besides, I find freshly cut meat to taste much better than pre-diced or ground meat.
  • If you ask your butcher for ground beef, do know that you should eat it within 12 hours. If you grind or dice it yourself, it can be kept 24 hours.

30mn French-Thaï fusion beef tartare – How to serve it

  • You can serve your tartare with fries or sweet potato fries, which will bring some nice texture, or rice for a more Thaï feel !
  • Don’t make your tartare in advance, because the lime might cook the beef slightly ; I recommend you to leave it in the fridge 30 minutes tops, no more.

Vegan Spring Rolls

I love it when I make dishes that are accidentally vegan.

I’m not saying that we should not be consciously trying to reduce our meat consumption, of course. In some rare instances though, when it just so happens that you left out the meat without trying, because taste-wise, it was not needed, those meals are often the best vegetarian/vegan ones.

Here, the magic peanut sauce is all you need to go from a bunch of veggies and rice noodles to a delicate, herbal and crunchy roll that is full of flavour. The sauce balance is perfect, with some honey and sriracha for the sugar and slight kick, some rice vinegar to offset the fat from the peanut butter, and the freshness and flavour from the garlic and ginger. The herbs are very important here, too, as they turn out to be a major contribution to the delicate and fresh flavour profile.

This Spring Rolls version is not an authentic one, as I tried to make my own, slightly simplified recipe.

Vegan Spring Rolls – Recipe

Ingredients – Where to find them

Some ingredients for this dish are basic Asian pantry items (soy sauce, rice vinegar, sriracha). You might have a tad more trouble finding rice vermicelli and rice paper, but you should be able to find those in traditional grocery stores, without needing to visit an Asian one.

Ingredients – Advice & key points

  • I must say it takes a bit of time to cut your veggies in matchsticks, but if you do it the way I showed in my video (especially for carrots : first slice quite diagonally, then cut in matchsticks), it should be quicker and easier !
  • I managed to find large rice papers, which I like better as you make less rolls (team Lazy forever !), but smaller ones, around the size of a plate, work perfectly well.
  • Be careful not to overfill your roll (check out my video), as it won’t close properly and might rip off !
  • Feel free to add other veggies, or replace some, depending on the seasons ! The ones I find best suited for a spring roll are, in particular :
    • raw red cabbage when in winter,
    • red bell pepper when in summer,
    • avocado if you feel like it (I find that it’s not needed with the rich peanut sauce, but see for yourself !)

Got everything you need ? Let’s roll !

20mn Spaghetti Aglio, Olio e Peperoncino

I remember the first time I ate this dish. Towards the end of our trip to Rome with my companion, we started to realize we had enjoyed the city a bit too much ; the cash was on the low-low !

We sat for what would be our last meal in the city, and I ordered the cheapest item on the menu of a rather nice restaurant ; pasta aglio, olio e peperoncino, which I remember to be less than 10€. I didn’t expect much from it though, as I had already, and I guess like many of us garlic lovers, drunkenly eaten pasta heated in a bit of olive oil with some garlic, and it wasn’t a dish to be remembered.

Once again, Italy proved me wrong. The flavours ! The garlic, intense but not overpowering, was paired with an amazing olive oil : IT’S A MATCH ! It didn’t need anything else, really, and while I appreciate the heat from the peperoncino and the freshness from the parsley, they remain optional in my view.

Years later, I tried to understand why the garlic flavour was so intense yet delicate, so I did my research. It turns out your must not heat garlic like you usually do, on medium-high heat for a few instants. On the contrary, the garlic should infuse in the oil. The lower the temperature, the better. That’s the secret of this recipe.

The time spent to pleasure ratio for this recipe is crazy. When you’re low on cash or short on time, just pick up some garlic and peperoncino, buy decent pasta, and cook this gem.

20mn Spaghetti Aglio, Olio e Peperoncino – Recipe

Ingredients – Advice & key points

  • Pasta :
    • I believe spaghetti is a great choice here, or any long-shaped pasta kind, as the light sauce will cling to it.
    • What you must not compromise on is using Bronze Drawn pasta. Why so ? Because when processed this way, the pasta will present small irregularities that will enable the oil-based sauce to cling to it.
  • Olive oil : As this ingredient is possibly the most important in this recipe, I strongly recommend using a good quality olive oil.

Cooking your pasta – Pieces of advice

  • Pasta :
    • Please salt your pasta water appropriately ! 10g of salt/liter is usually recommended.
    • As for most pasta recipe, we’ll finish cooking the pasta in the pan with the sauce (here, only for the last minute or two).
    • It is important that you start tasting 2 minutes before the package theoretical time, so that you get perfect al dente pasta.
  • Garlic sauce : The secret of this recipe is to start infusing your garlic in a cold pan, that you will put on your lowest temp setting. It needs to cook piano, piano, for the oil to become remarkably delicate, with the most perfect garlicky taste.

Now come and cook !

Japanese Kare Raisu with Chicken (Chicken Curry)

I can’t believe this is my first curry recipe. I love curries ! From the Indian to the Carribean, from the Japanese to the Thaï ones, each country has its own proud and fiery spice blend -and I love them all.

I never had Japanese Kare Raisu in Japan, but I did have several in Korea, sometimes in Japanese restaurants, sometimes in Korean ones with a Korean-Japanese adaptation. You could tell it was a popular dish here, just like Jjajangmyeon, for example, of Mapo Tofu, which are beloved Korean-Chinese dishes.

Contrary to what one might think, this curry is very fragrant. You might be worried by the absence of cream or tomatoes ; fear not, this thick curry won’t let your down ! The intense orangey-brown colour reflects the intensity and depth of flavour of this curry. Without the rice to dilute the taste, it’d be too strong and salty. With plain rice though, it’s just perfect.

You can go the easy way, like I did, using boxed curry blocks, which is a popular option in Japan ; you could also make your own Roux (a mix of spices and butter) yourself, which I’ll try in the future.

Japanese Kare Raisu with Chicken – Recipe

Ingredients – Advice & key points

  • Try to buy quality, deboned and skinned chicken thighs. It is important to use chicken thighs, which are juicy and tender ; the skin crisps up and caramelizes beautifully, and protects the meat from the high heat, allowing it to remain juicy. Simply ask your butcher to debone and skin it for you.
    • You could use chicken breasts if you don’t mind your meat being drier, or if you watch out for your fat intake.
    • Also, the quality focus makes a world of difference. I used free-range chicken thighs, and with my partner, we both said that the quality difference with restaurants items was huge.
  • You’ll find boxed curries in Asian stores, or online (Amazon in a handy option here). I used S&B Golden Curry, the Hot version, which was great, but there are many popular brands that I’d recommend, too, like Vermont Curry or Java Curry.
    • If you’re in Paris :
      • you can go to Tang Frères in the 13th (they have other stores in Paris but be careful, some are small, this one is large) or Paris Store in the 10th ;
      • ever since I moved to the 18th, I’ve been going to XP 16 or Chen Market, but those shops are slightly smaller, especially XP16, and you might not find everything you need. 
    • If you’re in France :
    • For my foreign friends : I bet you can easily find some Asian shops around you or online, but if you can’t, message me with your location and I will try to find it for you !
  • I used 2 Japanese cutting techniques in this recipe :
    • I cut my carrot Rangiri-style. You rotate the ingredients as you cut (see video), in order to create a more open surface and reduce the cooking time ; it also gives a quite pretty shape !
    • I cut my chicken Sogigiri-style. You try to cut as parallel to the cutting board as possible, so as to create here again a more open and flat surface, to shorten and homogenize the cooking time.
  • Don’t have boxed curries on hand, but crave a curry ? You can make a simple Tikka Masala using more classic spices from your cupboard !

How to eat your Japanese Kare Raisu

This dish is normally served with rice and Fukujinzuke, which is mix of pickled vegetables. I simply used some pickled onions I had in my fridge here.

Since this recipe is not that short and keeps well in the fridge or the freezer, do not hesitate to make a large batch !

Let’s dig into it !